This post is part of a larger series on RHCSA
Boot, reboot, and shut down a system normally
This bloated systemd trash has taken over our power controls, what next.
The real thing that’s going on under the hood is systemctl isolate poweroff.target. It has several shorthands:
- shutdown -P now
- telinit 0
- shutdown now
- systemctl poweroff
- poweroff
Boot systems into different targets manually
You can get and set the default targets to boot into with:
# Outputs graphical.target
sudo systemctl get-default

# Lists all available targets
systemctl list-unit-files --type=target --all

# Changes it to multi-user.target
sudo systemctl set-default multi-user.target

# Don't do this, it will soft-brick your computer, I tried it
sudo systemctl set-default poweroff.target

# Changes it back to graphical.target
sudo systemctl set-default graphical.target
What systemd is really doing under the hood is changing the symlink for /etc/systemd/system/default.target
[steven@rhel01 ~]$ ls -l /etc/systemd/system/default.target
lrwxrwxrwx. 1 root root 40 Jul 10 20:13 /etc/systemd/system/default.target -> /usr/lib/systemd/system/graphical.target
After that, the next reboot will boot into the target you specify.
Interrupt the boot process in order to gain access to a system
Edit the Linux Boot Parameters
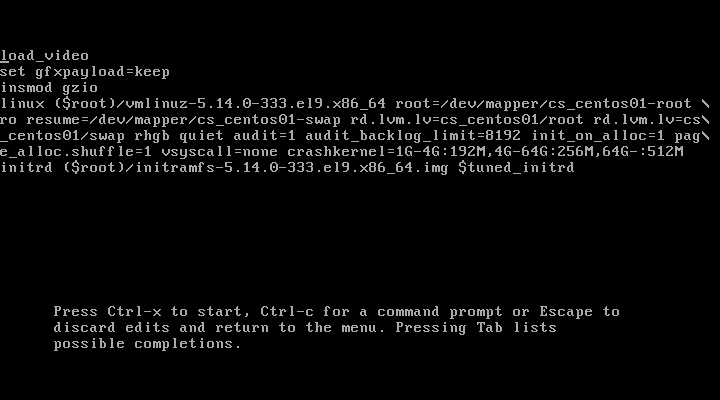
You can interrupt the boot process from the GRUB menu by pressing the e (edit) button. Once you do this it will display the default Linux boot parameters.

Take note of the parameters for your own interest and to be familiar with them. These are not on the test though.
- load_video is a function loads various modules via insmod for GRUB to setup video.
- set gfxpayload=keep determines that Linux will boot up in video mode. You can set this to text instead to boot Linux up into text mode.
- insmod gzio allows grub to work with gzip files. I assume this may be required to load the symvers kernel modules which are are in .gz files, but I am not certain.
Finally we get to the meat - the linux kernel itself and all the boot parameters. We can see all kinds of interesting things here. The kernel type linux, the kernel image that gets loaded, the path to the root directory (we can see it’s pointing to an LVM volume). There’s a lot of non-essential parameters (bloat)You likely aren’t tested on all the parameters here, but you do know how to edit the parameters.
rd.break
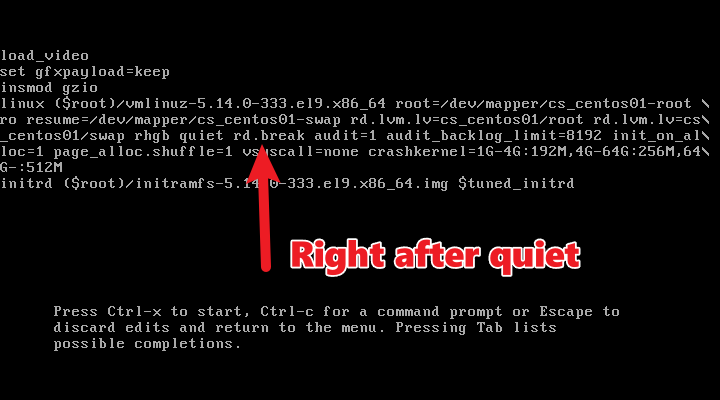
The parameter you need to know for sure is rd.break and the reason you need to know it is because it’s not there and you might someday need to add it. Adding the rd.break parameter will put a breakpoint in place after your initial ramdisk is loaded.
The other important thing is to know where to put it. I normally just put it after quiet, but it won’t work if you put it at the end.

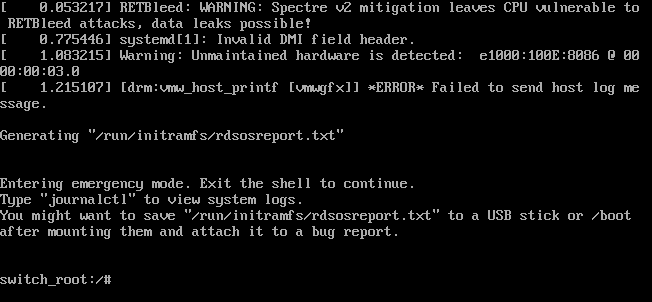
With the rd.break parameter inserted, press Ctrl+x to continue with booting. Instead of booting into your OS, you’ll be dropped into an emergency mode shell.
Password Recovery From Emergency Mode

From the emergency shell your system root directory / is mapped readonly to /sysroot. We need to first remount it as rw (read/write) so we can make changes to it required to reset the password. After it’s remounted we chroot into the /sysroot directory to make it our active environment.
mount -o remount,rw /sysroot
chroot /sysroot

# Now you can change the password
passwd root
It’s very important to note that at this point in emergency mode SELinux is not running. If you make changes to system files without SELinux running it will know and the file label won’t be correct for the /etc/shadow file, where passwords are stored. We must tell SELinux to relabel the files on next boot otherwise your system will fail to boot. We do this by making a file called /.autorelabel. Then we can exit the chroot and the emergency mode shell to continue booting.
# Create /.autorelabel file so SELinux knows to relabel the filesystem with defaults.
touch /.autorelabel

# Exit the chroot into /sysroot
exit

# Exit the emergency mode shell
exit
After exiting emergency mode shell the kernel will continue booting.
Identify CPU/memory intensive processes and kill processes
Use the common utilities you should already know about.
top
ps
pgrep
free
iostat
netstat
pkill
kill
Adjust process scheduling
nice
renice
Manage tuning profiles
You can use a utility called tuned to switch between tuning profiles. Tuning profiles define parameters such as disk settings, kernel parameters, network optimization settings, etc.
# Install tuned
sudo dnf install -y tuned
sudo systemctl enable --now tuned

# Extra / addtional tuned profiles are available and the package that provides them begins with tuned-profiles
dnf search tuned-profiles
You can get the list of profiles available with the tuned-adm list command and view the active profile with tuned-adm active command.
Locate and interpret system log files and journals
RHEL uses two logging utilities:
- rsyslog
- systemd-journald
Systemd-journald is the logging mechanism for systemd, however it has no facilities for forwarding logs. rsyslog can forward logs however, which is why we have two.
rsyslog
rsyslog keeps its logs in the /var/log directory in plain text format, so you can read them with standard unix utilities like cat, less, tail, grep, etc.
systemd-journald
Systemd log messages are stored in binary format and cannot be read with a text editor. You must use the journalctl utility. Read the man pages.
Preserve system journals
Logs for systemd-journald do not persist across reboots by default in RHEL, however this can be configured.
# Create a directory for persistent systemd-journald files
sudo mkdir /var/log/journal

# Edit journald.conf - only necessary if changed from default setting
sudo vim /etc/systemd/journald.conf
# [Journal]
# Storage=persistent
#
# Must be set to persistent or auto.  If set to auto, as long as
# the /var/log/journal directory exists it will persist

# Restart systemd-journald to apply changed configuration
sudo systemctl restart systemd-journald
Start, stop, and check the status of network services
This objective refers to services such as sshd, vsftp, httpd, and controlling them via the systemctl utility.
# Start a service
sudo systemctl start sshd

# Stop a service
sudo systemctl stop sshd

# Restart a service
sudo systemctl restart sshd

# Enable a service (auto start next reboot)
sudo systemctl enable sshd

# Enable a service and start it right now too
sudo systemctl enable sshd --now

# Disable a service
sudo systemctl disable sshd

# View status and latest output
sudo systemctl status sshd
Securely transfer files between systems
Know how to use sftp and scp.
scp
# Copy a file named file
scp file steven@10.69.69.142:/home/steven

# Copy a directory named dir
scp -r dir steven@10.69.69.142:/home/steven/
Read the man pages for for options such as connecting on different port or to use an SSH key.
sftp
sftp steven@10.69.69.142
# You are dropped into an interactive sftp shell
sftp> cd /etc
sftp> put /etc/resolv.conf