This post is part of a larger series on RHCSA
Access a shell prompt and issue commands with correct syntax
Bash
The shell is the program which is invoked as part of the login process for a user. Redhat uses bash as its default shell. The default shell can be set per-user in the /etc/passwd file.
The exam requires basic familiarity with how to navigate the shell.
# Prints working directory
pwd

# Lists files in a directory
ls

# Change directory
cd <dir>
Bash Startup Files
A bash shell can either be a login shell or non-login shell. The very first process that’s executed when a user logs in is the login shell, there is only one per login. Any shells spawned after that are children of the login shell and are considered non-login shells.
When the login shell starts it reads from the file /etc/profile. This file is used for all users on a system. The login shell then searches for files in the following order and runs the first one it finds then stops:
- ~/.bash_profile
- ~/.bash_login
- ~/.profile
The ~/.profile file is read by all shells including alternatives like zsh, whereas the ~/.bash_profile and ~/.bash_login files are only read by bash.
When bash starts as a non-login shell, first /etc/bashrc is ran which is a system-wide file for all users, then ~/.bashrc is ran which is a per-user configuration file.
Environment Variables
An environment is a set of variables which can be accessed by a process, for example a bash shell. When a process is forked, such as when a new non-login bash shell is started, the child process receives all the environment variables of the parent - they get passed on. Environment variables can be set with the export command.
export MY_VAR="This is an environment variable"
You can see what environment variables you have set with the env command.
Aliases
An alias is a shortcut for a command with default parameters.
alias alias_name="command -labcdefg --parameter_name=wow"
If you alias over a command such as ls, you can escape it with \ in front.
alias ls="ls -lahZ"

# runs ls -lahZ dir1
ls dir1

# runs ls dir1
\ls dir1
Bash History
The history command will list all commands in bash history. Ctrl+R at a bash shell will start a reverse history search. You can also reference the last bash command with !! and the last argument of the previous command with !$
# fails because no permission
rm -rf /home/worstEnemy

# success
sudo !!

# Note !$ will be /home/worstEnemy and not !!
# Outputs: You have deleted /home/worstEnemy
echo "You have deleted !$"
Using input-output redirection (>, », |, 2>, etc.)
It’s file descriptors all the way down
Redirection and piping are all about file descriptors (fd) under the hood. If you understand file descriptors, the rest comes naturally. A file descriptor is how a process can access a file through the kernel. A file descriptor is a positive integer starting from 0 that represents an entry in the file descriptor table. Each process has its own file descriptor table. When the process starts (from a fork), it inherits the file descriptors of its parent.
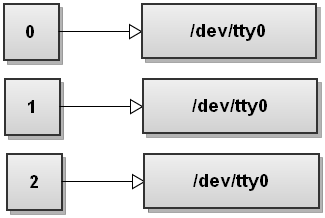
A typical shell has 3 default fd’s. fd 0 is stdin, fd 1 is stdout and fd 2 is stderr and these can be redirected to other files. Keep in mind, in *nix, everything is a file.
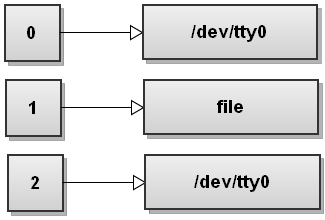
Redirect stdout
# Redirect the standard output of a program to a file
command >file

# This does the same thing, the 1 is implied if not specified
command 1>file
fd 1 is normally connected to stdout. You first specify the file descriptor id, then the > symbol, then where you want it to be directed to, in the above exame a file named file. In general you write command n>file which redirects file descriptor n to file.
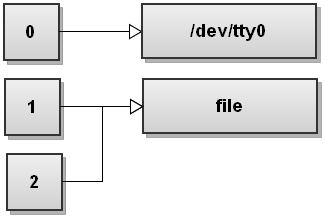
Redirect stderr
If you want to redirect one file descriptor to another file descriptor, you can do so in the format of x>&y where x is the fd you’re redirecting and y is the fd you’re redirecting to.
# Redirect stderr to stdout
command 2>&1
Order Matters
You can specify multiple redirections, and the order you specify them may matter if there are references to the same file descriptor in multiple redirections. Because of this it’s important to keep in mind that redirections are evaluated in order from left to right. It’s also important to note that redirections occur by passing value, not by reference. You can mutate an fd by making a redirection after it was used as a value for a previous redirection.
# Redirect both stdout and stderr to a file - remember the 1 is implied
command >file 2>&1

# Does not do the same thing - stderr would be printed to console
command 2>&1 >file
Redirections in Current Shell
You can use the exec command to perform a redirection in the current shell
# Redirect stdout of current shell to a file named file
exec >file
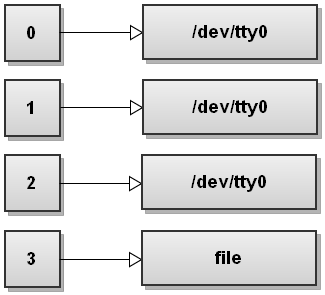
Custom File Descriptors
You can also create a custom file descriptor so you can open a file, use it for writing to a file. You use the special operator n>&- to close/nullify a file descriptor where n is the file descriptor id.
# Set file descriptor 3 to be directed to a file named file
exec 3>file

# Redirect various output to file descriptor 3
echo "this will be written to file descriptor 3" >&3
ps >&3
free -h >&3

# Close file descriptor 3 to free it up.  You can reuse the
# same integer later on for another use if you want.
exec 3>&-
Pipe
You can also pipe stdout of one command into stdin of another command.
# Counts the number of user logins
who | wc -l
Use grep and regular expressions to analyze text
grep can be used to print lines that match patterns
ps -aux | grep bash

# searches for a line with "pattern" in it in a file named "filename"
grep pattern filename

# does the same thing, plebs seem to like this one
cat filename | grep pattern
Access remote systems using SSH
Login with SSH
# Login with username name "user" to a server named "host"
ssh user@host

# You can specify port with -p parameter
ssh -p 42069 steven@stevenpolley.net
Upon first connecting to a remote system you’re prompted to confirm the identity of the remote system by its fingerprint.
The admin of the remote system can extract the fingerprint with the following command:
sudo ssh-keygen -v -lf /etc/ssh/ssh_host_ed25519_key
If can then be used to compare to validate the authenticity of the remote host and you can accept the identity. The fingerprint will be saved into the ~/.ssh/known_hosts file and checked next time you connect. If the fingerprint should ever change, you will get notified and the connection will not continue as the remote host may have been compromised. You will have to validate the new fingerprint is legitimate and if so then remove the previous entry from the known_hosts file.
SSH Server Configuration
The configuration file for SSH server is located at /etc/ssh/sshd_config. From there you can change the port SSH server listens on (22 by default), the bind address, whether passwords are allowed to be used, and more.
An SSH banner can be configured in the file /etc/banner, and the appropriate Banner directive in sshd_config must be uncommented.
After making changes to sshd_config, you must restart the SSH daemon to apply changes:
sudo systemctl restart sshd.service
In addition to opening an interactive bash shell, you can use programs like sftp or scp to transfer files over SSH.
Log in and switch users in multiuser targets
Switch Users
# Displays current user
whoami

# Switches to root user
sudo su -

# Switches to user named steven
sudo su - steven
Change targets / runlevels
Targets aka run levels are a way to specify what services need to be up and available at a specific time. For example, the network-online.target target is satisfied once all the prerequisite services to bring up networking are ready and NetworkManager completes its startup. Targets can be used to efficiently startup systemd units and ensure dependencies are met.
You can immeidately change between targets using the isolate command:
# Switch to multi-user.target
sudo systemctl isolate multi-user.target

# Switch to graphical.target
sudo systemctl isolate graphical.target
You can get and set the default targets to boot into with:
# Outputs graphical.target
sudo systemctl get-default

# Changes it to multi-user.target
sudo systemctl set-default multi-user.target
Archive, compress, unpack, and uncompress files using tar, star, gzip, and bzip2
These utilities are often used together. tar cannot compress files, it relies on programs like gzip and bzip2 to do compression. Conversely, programs like gzip and bzip2 cannot compress a directory, but only a single file - and that’s where tar comes in as it can transform a directory into a single file.
star is an application which does not come pre-installed with RHEL, but can be added by installing the star package.
tar
# Adds all files in mydir to an archive named archive.tar
tar -cf archive.tar mydir/*

# Extracting a tar archive
tar -xf archive.tar
compression
# Compresses file and names it file.gz
gzip file

# decompresses file.gz and names it file
gunzip file.gz

# tar supports integration with gzip with the -z flag
tar -czf archive.tar.gz file
star
Star can support multiple archive types and in the past was the only way to include SELinux labels in a tar archive. Since then tar has added native support for SELinux labels.
Star is also claimed to be the fastest implementation for creating and extracting tar archives, and may be worth consideration for large archives.
Create and edit text files
# Fill your water bottle and set aside an hour
vimtutor
Create, delete, copy, and move files and directories
N/A - no notes on this topic. If you need them, consider not touching grass for awhile.
Create hard and soft links
Hard Links
Hard links are used by filesystems for every file. The link is between the filename and the underlying data stored on the filesystem. Hard links are displayed in the second column of an ls -l command. Most files will have one hard link by default.
It’s also interesting to note that hard links are created automtically all the time with directories. A directory will have more hard links by default. Say you have a directory named dir1 and it has a subdirectory named dir2 and dir3. dir1 will actually have 4 hard links.
# Create directories
mkdir -p dir1/dir2
mkdir -p dir1/dir3

# Counts the number of hardlinks for dir1 - should return 4
ls -la | grep dir1 | cut -f 3 -d " "

# These are the paths for the hard links
cd dir1
cd dir1/.
cd dir1/dir2/..
cd dir1/dir3/..
Hard links can only be used for regular files, not directories. Also they can only be used for files within the same filesystem, it can’t span multiple filesystems.
To create a hard link, use the ln command without any parameters:
ln existing_file new_link_file
If you remove a hard link file, the data will still exist if the other hard links remain.
Soft Links
Also known as symbolic links. Soft links are not regular files, but special files that point to an existing file and they can span across filesystems. If you file the soft link points to, the data won’t be accessible by the soft link any more.
Soft links can also be created with the ln command, but with the -s flag:
ln -s existing_file new_link_file
List, set, and change standard ugo/rwx permissions
Listing Permissions
The long form output of ls with -l will show the permissions assigned to a file or directory
ls -l
drwxrwxrwx. 9 steven steven 4096 Jul 08 08:12 test
-rw-rw-r--. 1 steven steven 0    Jul 08 08:00 test.txt
The first filed is the file type. A regular - is a regular file, a directory will have d. There are other types as well such as “l” for links.
The next fields are bitwise flags that indicate whether the user, group or other users have read, write or execute permissions over the file.
| type | user | group | other |
|---|---|---|---|
| d | rwx | rwx | rwx |
- r = read
- w = write
- x = execute
Setting Permissions
The permissions are managed as bitwise flags and the decimal value is used to express the settings of the flags
| r | w | x | Value |
|---|---|---|---|
| 0 | 0 | 0 | 0 |
| 0 | 0 | 1 | 1 |
| 0 | 1 | 0 | 2 |
| 0 | 1 | 1 | 3 |
| 1 | 0 | 0 | 4 |
| 1 | 0 | 1 | 5 |
| 1 | 1 | 0 | 6 |
| 1 | 1 | 1 | 7 |
We can then use this to explicitly set permissions. The command for assigning permissions is chmod. If I wanted to assign rwxr-xr– to a file named testfile, I could do the following:
chmod 754 testfile
Changing Permissions
Rather than explicitly setting what permissions you want for a file, you can specify only what you want to change:
# Assign user and group execute permission
chmod ug+x testfile

# Remove other execute permission
chmod o-x testfile

# Make file readable by other
chmod o+r testfile

# Give everyone write access
chmod ugo+w
Locate, read, and use system documentation including man, info, and files in /usr/share/doc
Redhat has three completely offline sources of documentation.
Man Pages
Make sure you know how to use the man pages effectively. All you need to know is available right at your finger tips.
# Display a man page
man <manpage>

# Search man pages
apropos <keyword>
Info
Additional details for the curious mind that the man pages just don’t provide. Browseable documentation with links. You can find all the info pages just by running the info command without any parameters. While man pages are about a specific topic, info is more like a book.
Most of the documents under info are from GNU.
/usr/share/doc
In addition to man pages, and info pages, we also have /usr/share/doc. Here you will often find README’s, Change logs, configuration examples, usage examples and licenses.